Tag Archives: Cisco

Connecting GNS3 simulator to the Internet (part 2)

So now we need to configure a cloud to connect GNS3 to the laptop. We should already have tap0 up and running and IPtables configured to allow traffic as seen on the previous post.

Below is a network topology diagram.
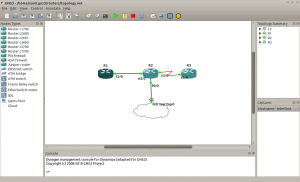

GNS3 topology

We need to create the cloud connecting it to tap0 interface. For that we edit the .net file containing the topology and add the following.


[[ROUTER R2]]
model = 3640
console = 2002
aux = 2108
cnfg = configs/R2.cfg
slot0 = NM-1FE-TX
f0/0 = nio_tap:tap0
slot1 = NM-4T
s1/0 = R3 s1/0
slot2 = NM-1E
e2/0 = R1 f2/0
slot3 = NM-16ESW
x = -21.0
y = -61.0

and for the cloud

[[Cloud C2]]
x = -63.8566172588
y = 84.919044975
connections = R2:f0/0:nio_tap:tap0

Now save the configuration and restart GNS3.

Now there should be connectivity to the gateway (192.168.1.1). To connect to the internet add a default gateway.

Router2#conf t
Enter configuration commands, one per line. End with CNTL/Z.
Router2(config)#ip rou
Router2(config)#ip route
Router2(config)#ip route 0.0.0.0 0.0.0.0 192.168.1.1
Router2(config)#do sh ip route
Codes: C – connected, S – static, R – RIP, M – mobile, B – BGP
D – EIGRP, EX – EIGRP external, O – OSPF, IA – OSPF inter area
N1 – OSPF NSSA external type 1, N2 – OSPF NSSA external type 2
E1 – OSPF external type 1, E2 – OSPF external type 2
i – IS-IS, su – IS-IS summary, L1 – IS-IS level-1, L2 – IS-IS level-2
ia – IS-IS inter area, * – candidate default, U – per-user static route
o – ODR, P – periodic downloaded static route

Gateway of last resort is 192.168.1.1 to network 0.0.0.0

172.16.0.0/16 is variably subnetted, 2 subnets, 2 masks
C 172.16.0.0/30 is directly connected, Ethernet2/0
D 172.16.0.0/16 is a summary, 00:18:32, Null0
10.0.0.0/8 is variably subnetted, 2 subnets, 2 masks
C 10.0.0.0/30 is directly connected, Serial1/0
D 10.0.0.0/8 is a summary, 00:18:32, Null0
192.168.1.0/30 is subnetted, 1 subnets
C 192.168.1.0 is directly connected, FastEthernet0/0
S* 0.0.0.0/0 [1/0] via 192.168.1.1
Router2(config)#

We can see the connectivity below.

Connectivity to the internet

Also don’t forget to add the routes on your Linux box for the other routers.

[11:07:13] xavi@lstkco14073: ~ $ sudo ip route add 172.16.0.0/30 dev tap0
[11:07:49] xavi@lstkco14073: ~ $ sudo ip route add 10.0.0.0/30 dev tap0
[11:08:13] xavi@lstkco14073: ~ $ netstat -nr | grep tap
10.0.0.0 0.0.0.0 255.255.255.252 U 0 0 0 tap0
172.16.0.0 0.0.0.0 255.255.255.252 U 0 0 0 tap0
192.168.1.0 0.0.0.0 255.255.255.0 U 0 0 0 tap0
[11:08:21] xavi@lstkco14073: ~ $ ping -c 3 10.0.0.1
PING 10.0.0.1 (10.0.0.1) 56(84) bytes of data.
64 bytes from 10.0.0.1: icmp_req=1 ttl=255 time=19.9 ms
64 bytes from 10.0.0.1: icmp_req=2 ttl=255 time=3.12 ms
64 bytes from 10.0.0.1: icmp_req=3 ttl=255 time=6.61 ms

— 10.0.0.1 ping statistics —
3 packets transmitted, 3 received, 0% packet loss, time 2001ms
rtt min/avg/max/mdev = 3.122/9.878/19.901/7.229 ms
[11:08:39] xavi@lstkco14073: ~ $

That would be all. Comments and suggestions are more than welcome. 🙂

Connecting GNS3 simulator to the Internet

I know it’s been a while. No, I haven’t been lost, in Guantanamo or similar. I was just too lazy/busy to write a post. But luckily I’m back. 🙂

Today I’m going to write about how to connect GNS3 lab to the internet. For this we are going to have to create a tap interface on our Debian box. First thing would be to install the uml-utilities on your Debian box.

[10:52:55] xavi@lstkco14073: ~ $ sudo aptitude search uml-utilities
i uml-utilities            – User-mode Linux (utility programs)
[10:53:00] xavi@lstkco14073: ~ $

Now install with:

[10:53:00] xavi@lstkco14073: ~ $ sudo aptitude install uml-utilities

Once uml-utilities is installed you can execute the following script to bring up a tap interface.

#!/bin/bash
sudo tunctl -t tap0 -u `whoami`
sudo ifconfig tap0 192.168.1.1 netmask 255.255.255.252 up
/sbin/ifconfig tap0

[11:02:06] xavi@lstkco14073: ~ $ sh tap0
Set ‘tap0’ persistent and owned by uid 1000
tap0 Link encap:Ethernet HWaddr 5e:3c:9d:d8:ff:9a
inet addr:192.168.1.1 Bcast:192.168.1.255 Mask:255.255.255.252
UP BROADCAST RUNNING MULTICAST MTU:1500 Metric:1
RX packets:0 errors:0 dropped:0 overruns:0 frame:0
TX packets:0 errors:0 dropped:0 overruns:0 carrier:0
collisions:0 txqueuelen:500
RX bytes:0 (0.0 B) TX bytes:0 (0.0 B)

[11:02:17] xavi@lstkco14073: ~ $

We would need to connect this tap interface to the GNS3 simulation. We also would need to configure iptables to allow routing on the Debian box. For that we need to execute the following script.

#!/bin/bash
# Script to enable IP packet forwarding and NAT
#
# eth0 is Internet connected interface

# Enable IP Forwarding
echo 1 > /proc/sys/net/ipv4/ip_forward

# Clean up iptables
iptables -F
iptables -t nat -F
iptables -X

# Enable IP MASQUERADING/NAT
iptables -t nat -A POSTROUTING -o eth0 -j MASQUERADE

# Set firewall policies
iptables -P FORWARD ACCEPT
iptables -P OUTPUT ACCEPT

# Allow all connections not from wlan0
iptables -A INPUT ! -i eth0 -j ACCEPT

# Allow all ICMP connections
iptables -A INPUT -p ICMP -j ACCEPT

# Allow all already established connections
iptables -A INPUT -m state --state ESTABLISHED,RELATED -j ACCEPT

In our next post we would configure the GNS3 simulator. Comments are always welcome.

Configuring VPN client under Linux

Due to my work I sometimes have to VPN to my job from home. But I use a Linux PowerPC laptop and have to log in to a Cisco box. Cisco doesn’t provides support for Linux on PowerPC. So where is the solution? The solution is VPNC. How do we install it? Easy:

shell$ sudo aptitude install vpnc

Now we need to configure the config file. We are going to modify /etc/vpnc/example.conf.

shell$ sudo cp /etc/vpnc/example.conf /etc/vpnc/connect.conf
shell$ cat /etc/vpnc/connect.conf
#IPSec gateway
#IPSec ID
#IPSec secret
#IKE Authmode hybrid
#Xauth username

We need to replace the gateway entry with the IP/hostname of the server we want to connect to, the ID with the group you belong to, the secret with the password for the group you belong to and the username with your username. Once configured you just have to fire up vpnc.

shell$ sudo vpnc /etc/vpnc/connect.conf
Enter password for username@server:
Connect Banner:
| Connecting to VPN.

VPNC started in background (pid: 4566)…
shell$

Now you should be able to see a tun interface when executing /sbin/ifconfig.

shell$ /sbin/ifconfig tun0
tun0 Link encap:UNSPEC HWaddr 00-00-00-00-00-00-00-00-00-00-00-00-00-00-00-00
inet addr:192.168.20.22 P-t-P:192.168.20.22 Mask:255.255.255.255
UP POINTOPOINT RUNNING NOARP MULTICAST MTU:1412 Metric:1
RX packets:2 errors:0 dropped:0 overruns:0 frame:0
TX packets:2 errors:0 dropped:0 overruns:0 carrier:0
collisions:0 txqueuelen:500
RX bytes:290 (290.0 B) TX bytes:154 (154.0 B)
shell$

Enjoy your VPN connection. More info here and here.