Tag Archives: Debian

Checking connections on a particular service

So lets say you want to see how many established connections we have on a particular port/service. Most of the people would use netstat, however I prefer ss.

On a Debian based system ss can be installed with the iproute package.

user@server: ~ $ sudo dpkg -S `which ss`
iproute: /sbin/ss
user@server: ~ $

On a Red Hat based system it will be installed with iproute too.

[user@redhat ~]# sudo rpm -qf `which ss`
iproute-2.6.18-11.el5
[user@redhat ~]#

aptitude install iproute and yum install iproute will install the package on a Debian and Red Hat system respectively.

Now lets show some examples. Lets say we want to see how many established ssh connections there are.

[user@redhat ~]# sudo ss -t '( sport = :22 )'
State Recv-Q Send-Q Local Address:Port Peer Address:Port
ESTAB 0 0 ::ffff:10.40.7.12:ssh ::ffff:10.16.241.194:56325
ESTAB 0 0 ::ffff:10.40.7.12:ssh ::ffff:10.16.241.194:53804
ESTAB 0 0 ::ffff:10.40.7.12:ssh ::ffff:10.16.241.194:60486
ESTAB 0 0 ::ffff:10.40.7.12:ssh ::ffff:10.14.17.48:37471
ESTAB 0 0 ::ffff:10.40.7.12:ssh ::ffff:10.16.241.194:57982
ESTAB 0 0 ::ffff:10.40.7.12:ssh ::ffff:10.16.241.194:57525
ESTAB 0 304 ::ffff:10.40.7.9:ssh ::ffff:10.14.17.22:46376
ESTAB 0 0 ::ffff:10.40.7.9:ssh ::ffff:10.16.241.28:42654
ESTAB 0 0 ::ffff:10.40.7.9:ssh ::ffff:10.16.241.12:36276
ESTAB 0 0 ::ffff:10.40.7.9:ssh ::ffff:10.16.241.8:57936
ESTAB 0 0 ::ffff:10.40.7.9:ssh ::ffff:10.16.241.28:42855
[user@redhat ~]#

-t displays all TCP sockets

You can also substitute the port number by the name of the service that runs in it by default.

user@debian:~$ sudo ss -t '( sport = :mysql )'
State Recv-Q Send-Q Local Address:Port Peer Address:Port
ESTAB 0 0 192.168.140.121:mysql 192.168.137.234:35512
user@debian:~$

To see all opened ports on the server use the -a option.

xavi@linode2:~$ sudo ss -t -a
State       Recv-Q Send-Q                   Local Address:Port       Peer Address:Port   
LISTEN      0      5                                    *:nrpe              *:*       
LISTEN      0      50                     192.168.140.121:mysql             *:*       
LISTEN      0      8                                    *:pop3              *:*       
LISTEN      0      8                                    *:imap2             *:*       
LISTEN      0      128                                 :::www              :::*       
LISTEN      0      128                                  *:ssh               *:*       
LISTEN      0      128                                 :::ssh              :::*       
LISTEN      0      100                                  *:smtp              *:*       
LISTEN      0      128                                 :::https            :::*       
TIME-WAIT   0      0               ::ffff:173.255.231.252:www          ::ffff:79.158.142.28:55032   
ESTAB       0      0                      192.168.140.121:mysql               192.168.137.234:35512  
ESTAB       0      48                     173.255.231.252:ssh                 79.158.142.28:48395   
TIME-WAIT   0      0               ::ffff:173.255.231.252:www          ::ffff:79.158.142.28:55033   
TIME-WAIT   0      0               ::ffff:173.255.231.252:www          ::ffff:173.255.231.252:37223 
xavi@linode2:~$

I believe ss command is simpler to use but less known than netstat. Enjoy.
Connecting GNS3 simulator to the Internet (part 2)

So now we need to configure a cloud to connect GNS3 to the laptop. We should already have tap0 up and running and IPtables configured to allow traffic as seen on the previous post.

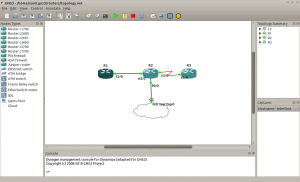
Below is a network topology diagram.


GNS3 topology

We need to create the cloud connecting it to tap0 interface. For that we edit the .net file containing the topology and add the following.


[[ROUTER R2]]
model = 3640
console = 2002
aux = 2108
cnfg = configs/R2.cfg
slot0 = NM-1FE-TX
f0/0 = nio_tap:tap0
slot1 = NM-4T
s1/0 = R3 s1/0
slot2 = NM-1E
e2/0 = R1 f2/0
slot3 = NM-16ESW
x = -21.0
y = -61.0

and for the cloud

[[Cloud C2]]
x = -63.8566172588
y = 84.919044975
connections = R2:f0/0:nio_tap:tap0

Now save the configuration and restart GNS3.

Now there should be connectivity to the gateway (192.168.1.1). To connect to the internet add a default gateway.

Router2#conf t
Enter configuration commands, one per line. End with CNTL/Z.
Router2(config)#ip rou
Router2(config)#ip route
Router2(config)#ip route 0.0.0.0 0.0.0.0 192.168.1.1
Router2(config)#do sh ip route
Codes: C – connected, S – static, R – RIP, M – mobile, B – BGP
D – EIGRP, EX – EIGRP external, O – OSPF, IA – OSPF inter area
N1 – OSPF NSSA external type 1, N2 – OSPF NSSA external type 2
E1 – OSPF external type 1, E2 – OSPF external type 2
i – IS-IS, su – IS-IS summary, L1 – IS-IS level-1, L2 – IS-IS level-2
ia – IS-IS inter area, * – candidate default, U – per-user static route
o – ODR, P – periodic downloaded static route

Gateway of last resort is 192.168.1.1 to network 0.0.0.0

172.16.0.0/16 is variably subnetted, 2 subnets, 2 masks
C 172.16.0.0/30 is directly connected, Ethernet2/0
D 172.16.0.0/16 is a summary, 00:18:32, Null0
10.0.0.0/8 is variably subnetted, 2 subnets, 2 masks
C 10.0.0.0/30 is directly connected, Serial1/0
D 10.0.0.0/8 is a summary, 00:18:32, Null0
192.168.1.0/30 is subnetted, 1 subnets
C 192.168.1.0 is directly connected, FastEthernet0/0
S* 0.0.0.0/0 [1/0] via 192.168.1.1
Router2(config)#

We can see the connectivity below.

Connectivity to the internet

Also don’t forget to add the routes on your Linux box for the other routers.

[11:07:13] xavi@lstkco14073: ~ $ sudo ip route add 172.16.0.0/30 dev tap0
[11:07:49] xavi@lstkco14073: ~ $ sudo ip route add 10.0.0.0/30 dev tap0
[11:08:13] xavi@lstkco14073: ~ $ netstat -nr | grep tap
10.0.0.0 0.0.0.0 255.255.255.252 U 0 0 0 tap0
172.16.0.0 0.0.0.0 255.255.255.252 U 0 0 0 tap0
192.168.1.0 0.0.0.0 255.255.255.0 U 0 0 0 tap0
[11:08:21] xavi@lstkco14073: ~ $ ping -c 3 10.0.0.1
PING 10.0.0.1 (10.0.0.1) 56(84) bytes of data.
64 bytes from 10.0.0.1: icmp_req=1 ttl=255 time=19.9 ms
64 bytes from 10.0.0.1: icmp_req=2 ttl=255 time=3.12 ms
64 bytes from 10.0.0.1: icmp_req=3 ttl=255 time=6.61 ms

— 10.0.0.1 ping statistics —
3 packets transmitted, 3 received, 0% packet loss, time 2001ms
rtt min/avg/max/mdev = 3.122/9.878/19.901/7.229 ms
[11:08:39] xavi@lstkco14073: ~ $

That would be all. Comments and suggestions are more than welcome. 🙂

Connecting GNS3 simulator to the Internet

I know it’s been a while. No, I haven’t been lost, in Guantanamo or similar. I was just too lazy/busy to write a post. But luckily I’m back. 🙂

Today I’m going to write about how to connect GNS3 lab to the internet. For this we are going to have to create a tap interface on our Debian box. First thing would be to install the uml-utilities on your Debian box.

[10:52:55] xavi@lstkco14073: ~ $ sudo aptitude search uml-utilities
i uml-utilities            – User-mode Linux (utility programs)
[10:53:00] xavi@lstkco14073: ~ $

Now install with:

[10:53:00] xavi@lstkco14073: ~ $ sudo aptitude install uml-utilities

Once uml-utilities is installed you can execute the following script to bring up a tap interface.

#!/bin/bash
sudo tunctl -t tap0 -u `whoami`
sudo ifconfig tap0 192.168.1.1 netmask 255.255.255.252 up
/sbin/ifconfig tap0

[11:02:06] xavi@lstkco14073: ~ $ sh tap0
Set ‘tap0’ persistent and owned by uid 1000
tap0 Link encap:Ethernet HWaddr 5e:3c:9d:d8:ff:9a
inet addr:192.168.1.1 Bcast:192.168.1.255 Mask:255.255.255.252
UP BROADCAST RUNNING MULTICAST MTU:1500 Metric:1
RX packets:0 errors:0 dropped:0 overruns:0 frame:0
TX packets:0 errors:0 dropped:0 overruns:0 carrier:0
collisions:0 txqueuelen:500
RX bytes:0 (0.0 B) TX bytes:0 (0.0 B)

[11:02:17] xavi@lstkco14073: ~ $

We would need to connect this tap interface to the GNS3 simulation. We also would need to configure iptables to allow routing on the Debian box. For that we need to execute the following script.

#!/bin/bash
# Script to enable IP packet forwarding and NAT
#
# eth0 is Internet connected interface

# Enable IP Forwarding
echo 1 > /proc/sys/net/ipv4/ip_forward

# Clean up iptables
iptables -F
iptables -t nat -F
iptables -X

# Enable IP MASQUERADING/NAT
iptables -t nat -A POSTROUTING -o eth0 -j MASQUERADE

# Set firewall policies
iptables -P FORWARD ACCEPT
iptables -P OUTPUT ACCEPT

# Allow all connections not from wlan0
iptables -A INPUT ! -i eth0 -j ACCEPT

# Allow all ICMP connections
iptables -A INPUT -p ICMP -j ACCEPT

# Allow all already established connections
iptables -A INPUT -m state --state ESTABLISHED,RELATED -j ACCEPT

In our next post we would configure the GNS3 simulator. Comments are always welcome.

Squeeze is now stable

So squeeze is now stable. Together with the new Debian stable release the guys also updated the website.

I have created a small bash script to perform the upgrade. Here it is.

#!/bin/bash
echo "Moving to /etc/apt"
cd /etc/apt
echo "Backing up sources.list"
cp sources.list sources.list.`date +%F`
echo "Changing the sources for squeeze"
sed 's/lenny/squeeze/g' sources.list > squeeze.sources.list
echo "Copying squeeze to sources.list"
cp squeeze.sources.list sources.list
echo "Performing the upgrade."
apt-get update
apt-get dist-upgrade

Run the script as root or use sudo when executing.

Resulting file should be something like the following.

## main & security repositories
deb http://ftp.us.debian.org/debian/ squeeze main
deb-src http://ftp.us.debian.org/debian/ squeeze main
deb http://security.debian.org/ squeeze/updates main
deb-src http://security.debian.org/ squeeze/updates main

References:

  1. Go2Linux
  2. Linode